¶ Overview
.png)
¶ Step 1: Set up the Corporate Lists
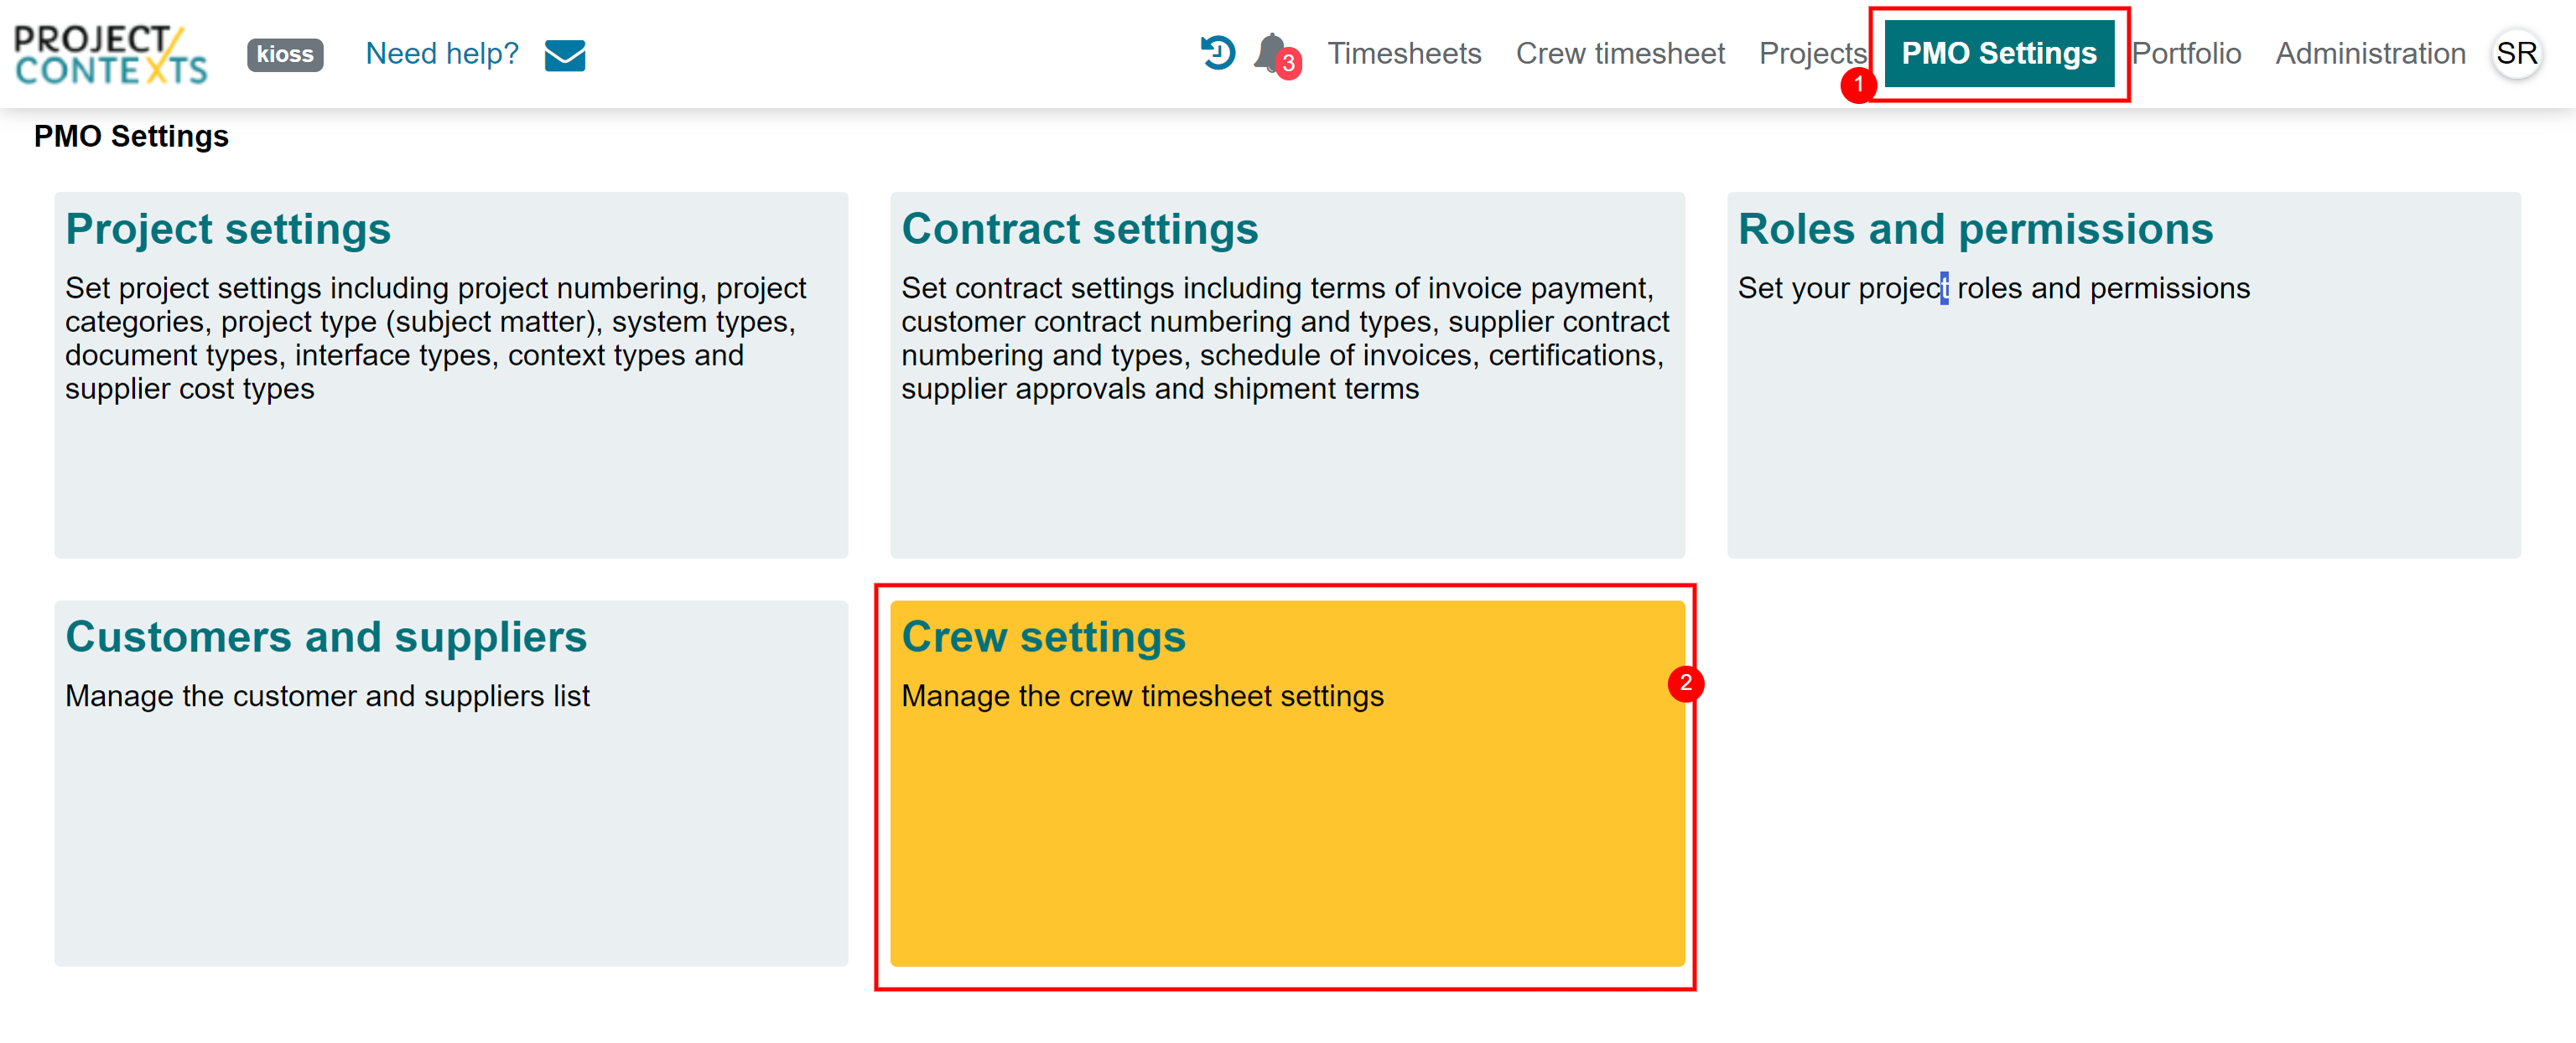
- The Corporate Lists of properties are to be set up in the PMO Settings section of the app.
- For the Crew Timesheet, all the properties are in the Crew settings sub section
¶ Step 1.1: Add Crew Leaders to Corporate list
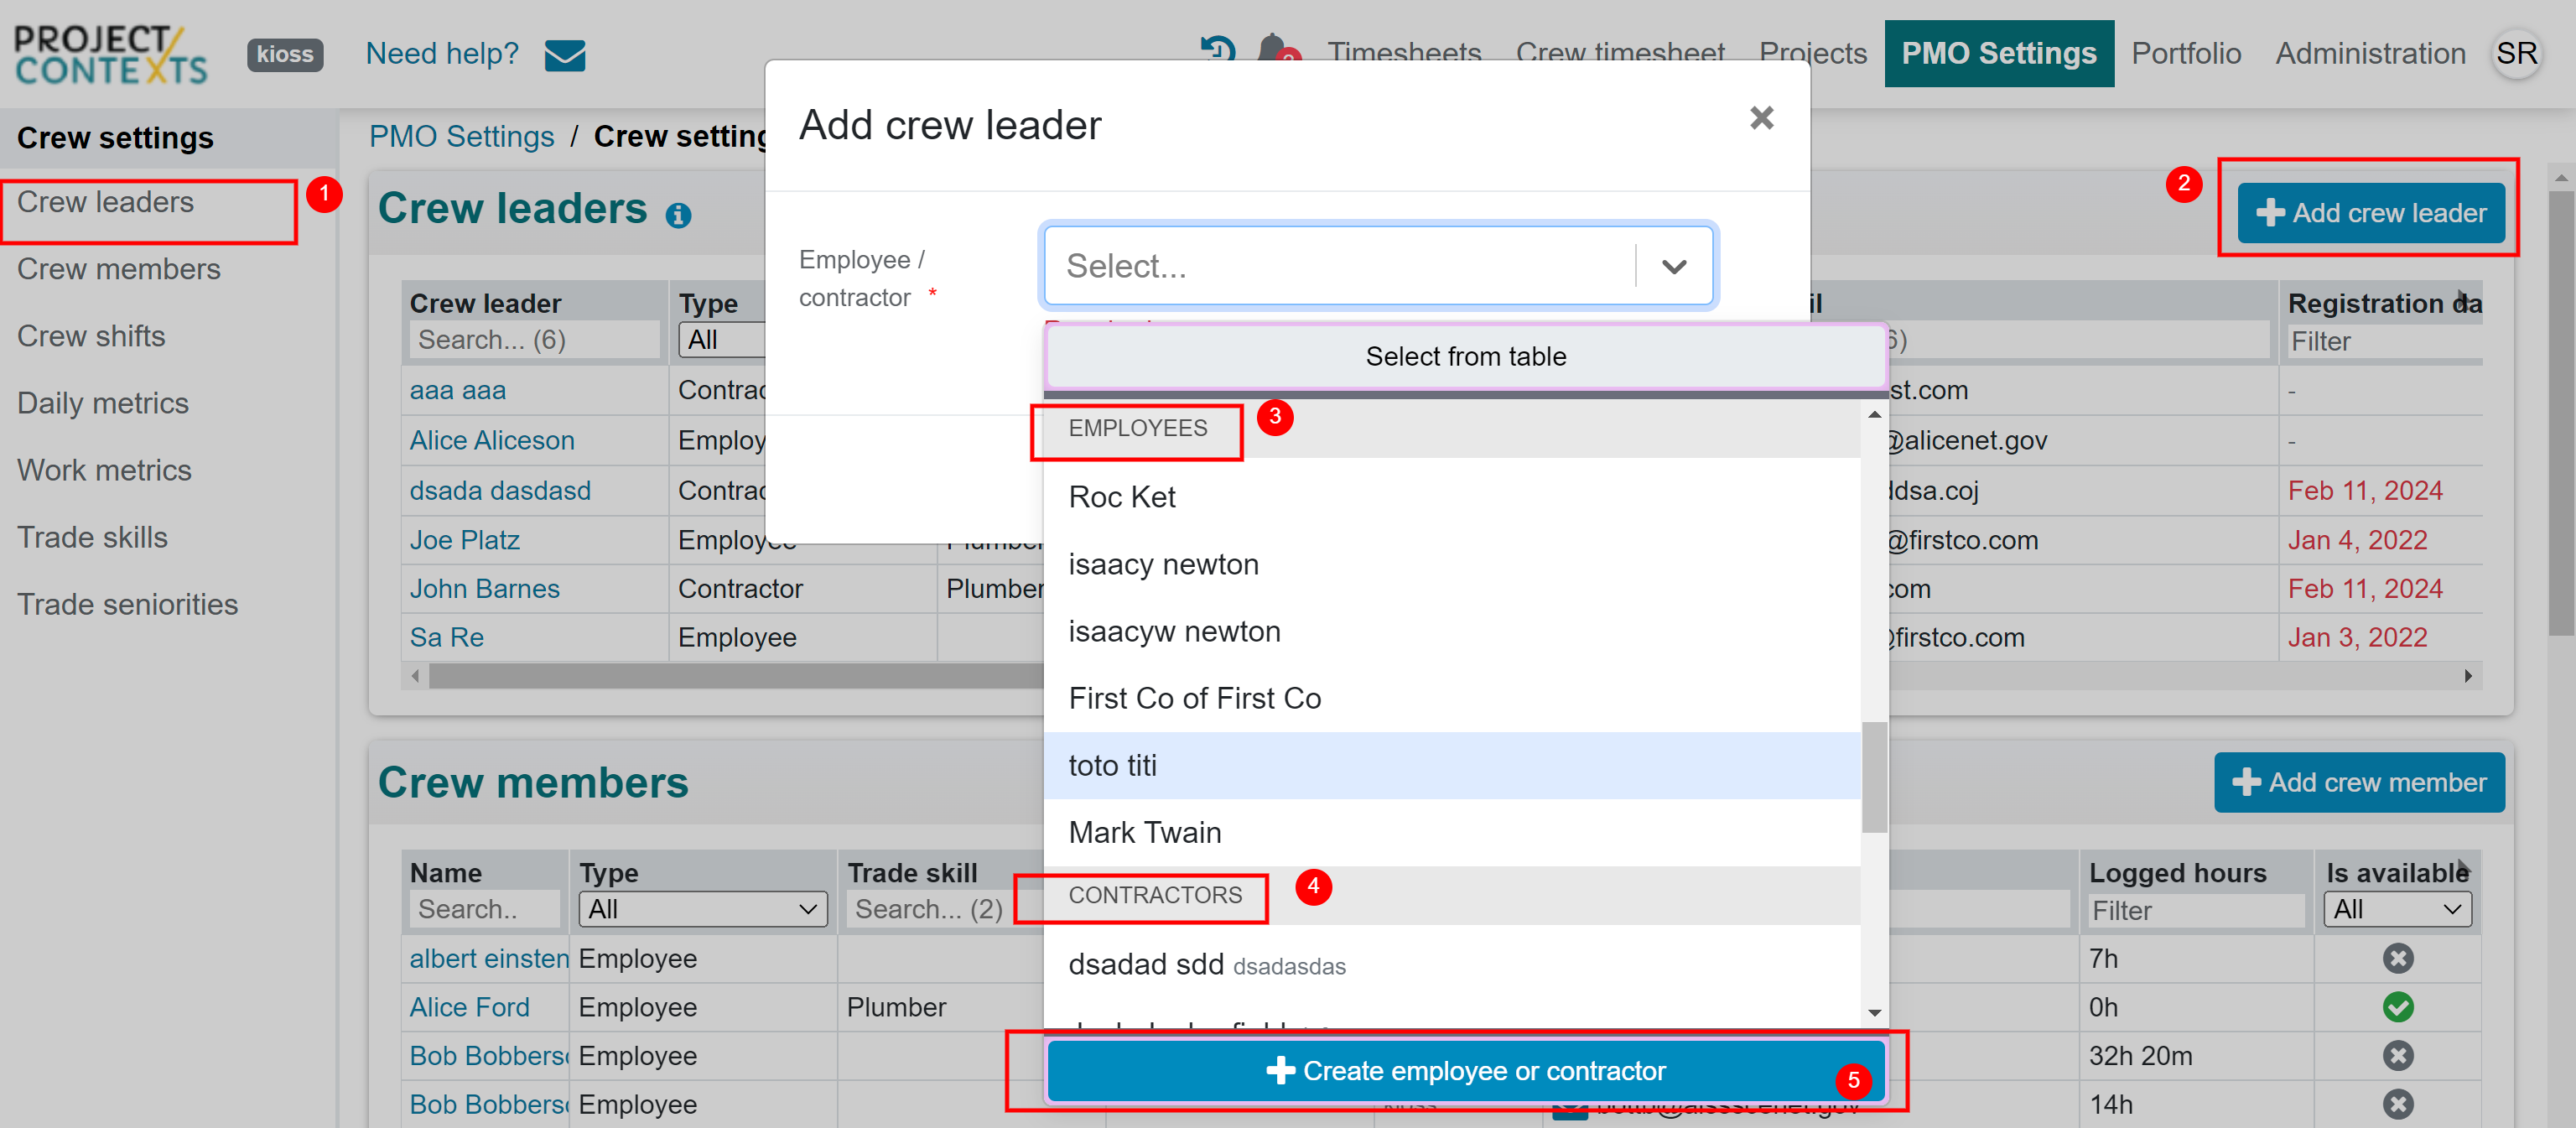
- Click on the Crew leader item in the left menu and then click on Add crew leader button on the far right corner of the page
- In the Add crew leader dialog that opens you can add Crew leaders in either way:
- Select from existing Employees list
- Select from existing Contractors list
- Create employee or contractor on the fly and add them as Crew leader
- Please note that:
- A valid Crew Leader License is required for each Crew Leader in the list
- If all the Crew Leader Licenses for your company have been used up,
- you will not be able to add new Crew leaders
- the crew leaders without license will become unavailable, meaning they will not be able to use the crew timesheet
¶ Step 1.2: Add Crew Members to Corporate list
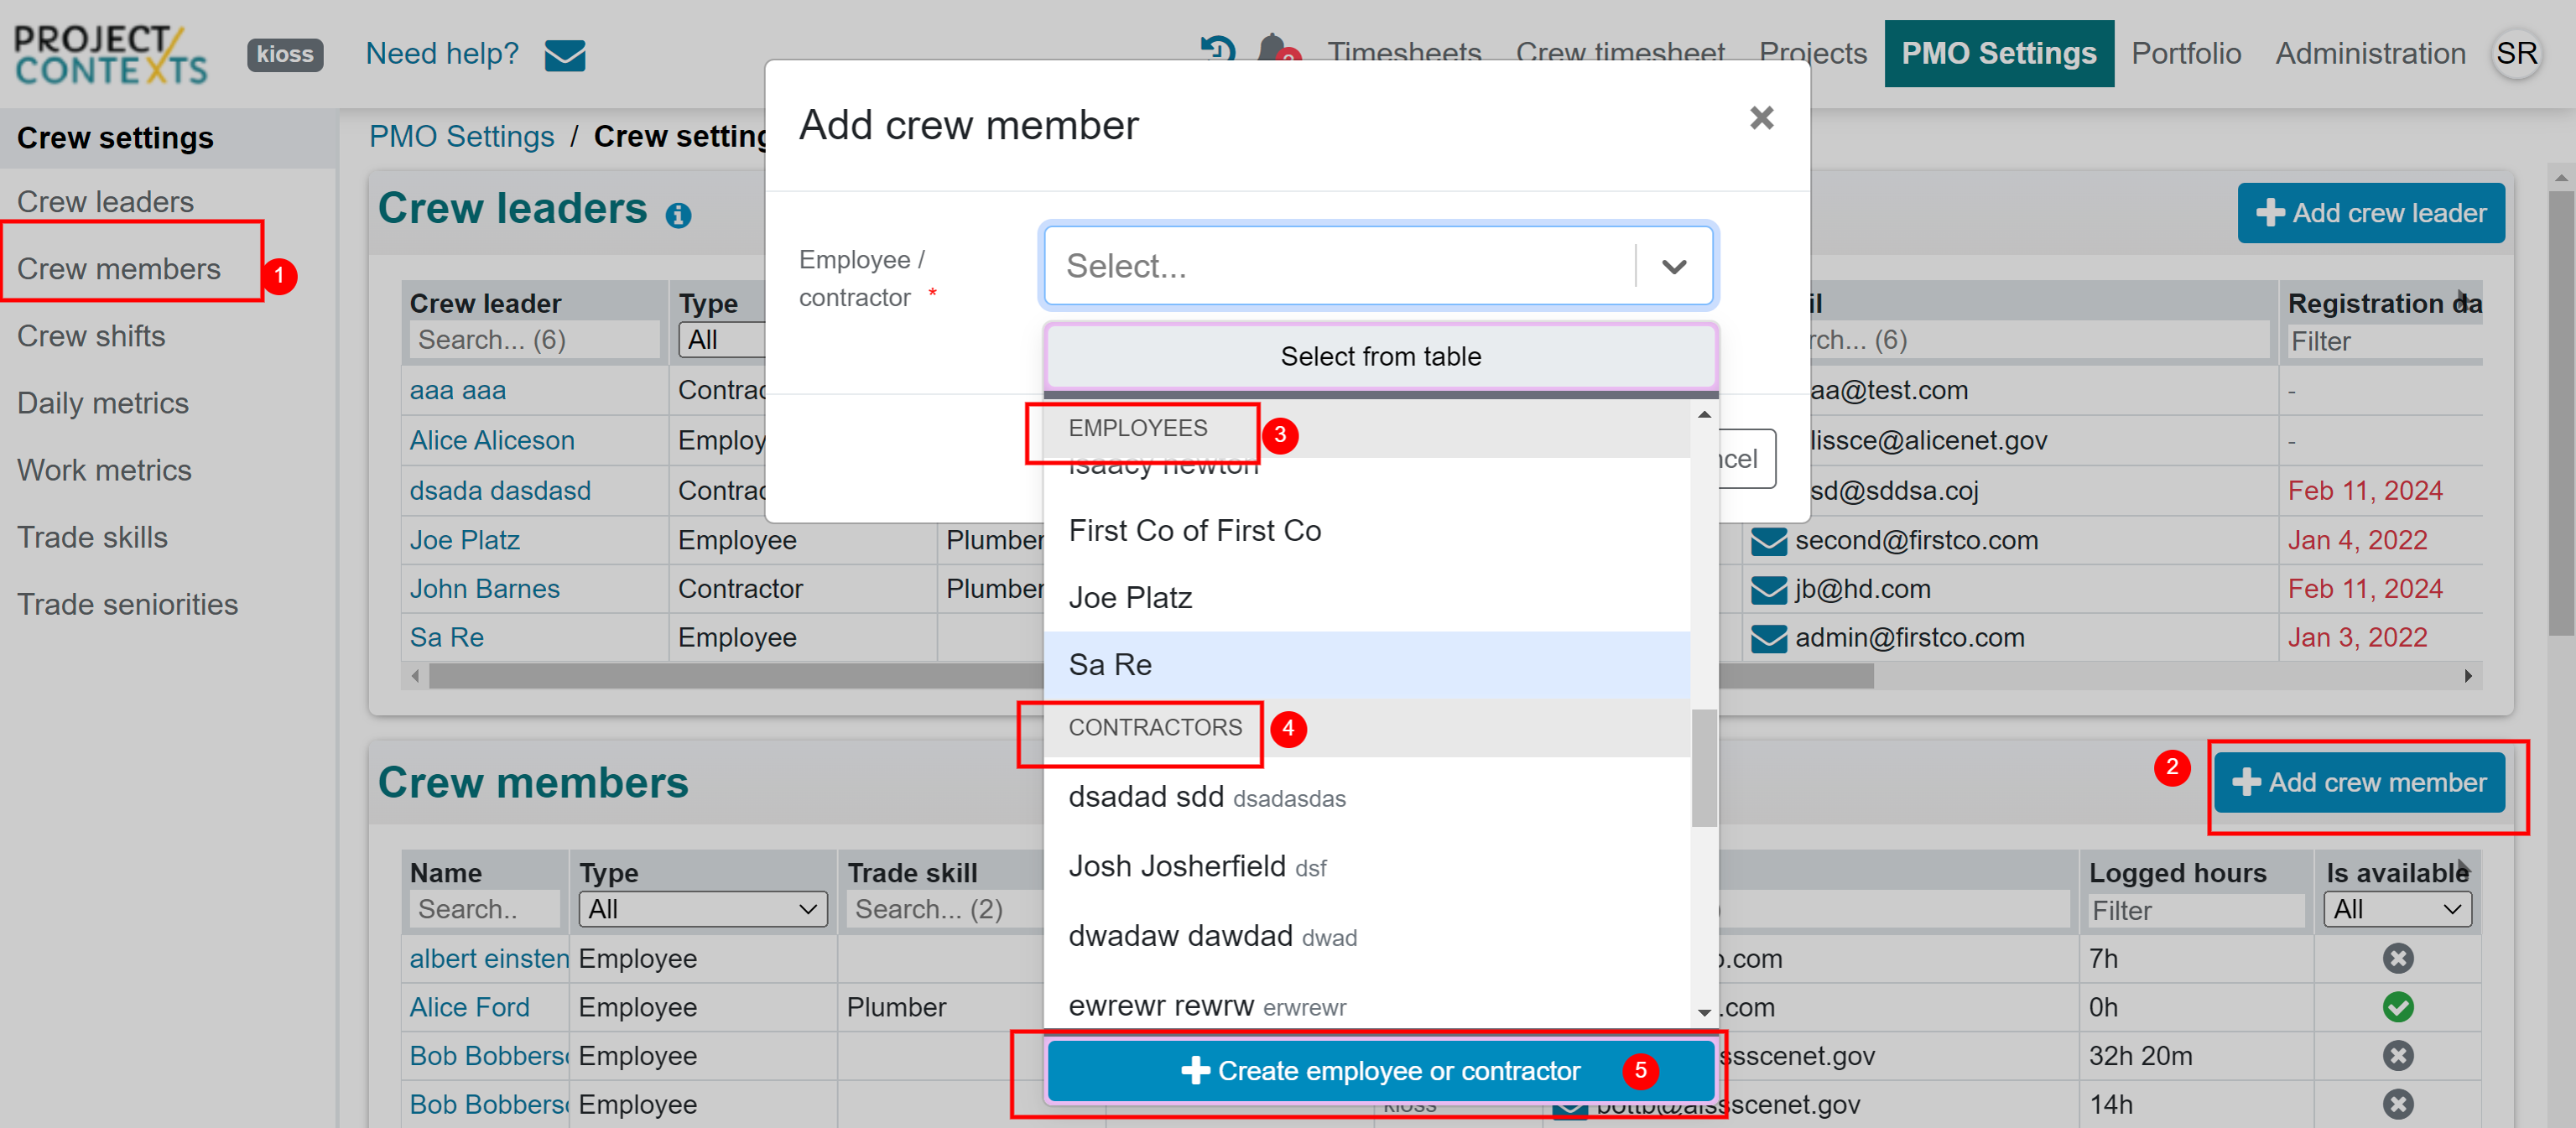
- Click on the Crew member item in the left menu and then click on Add crew member button on the far right corner of the page
- In the Add crew member dialog that opens you can add Crew members in either way:
- Select from existing Employees list
- Select from existing Contractors list
- Create employee or contractor on the fly and add them as Crew member
- Please note that:
- A valid Crew Member License is required for each Crew Member in the list
- If all the Crew Member Licenses for your company have been used up,
- you will not be able to add new Crew members, or
- the crew members without license will become unavailable, meaning they will not be available for project selection or time logging
¶ Step 1.3: Add Work Metrics to Corporate list
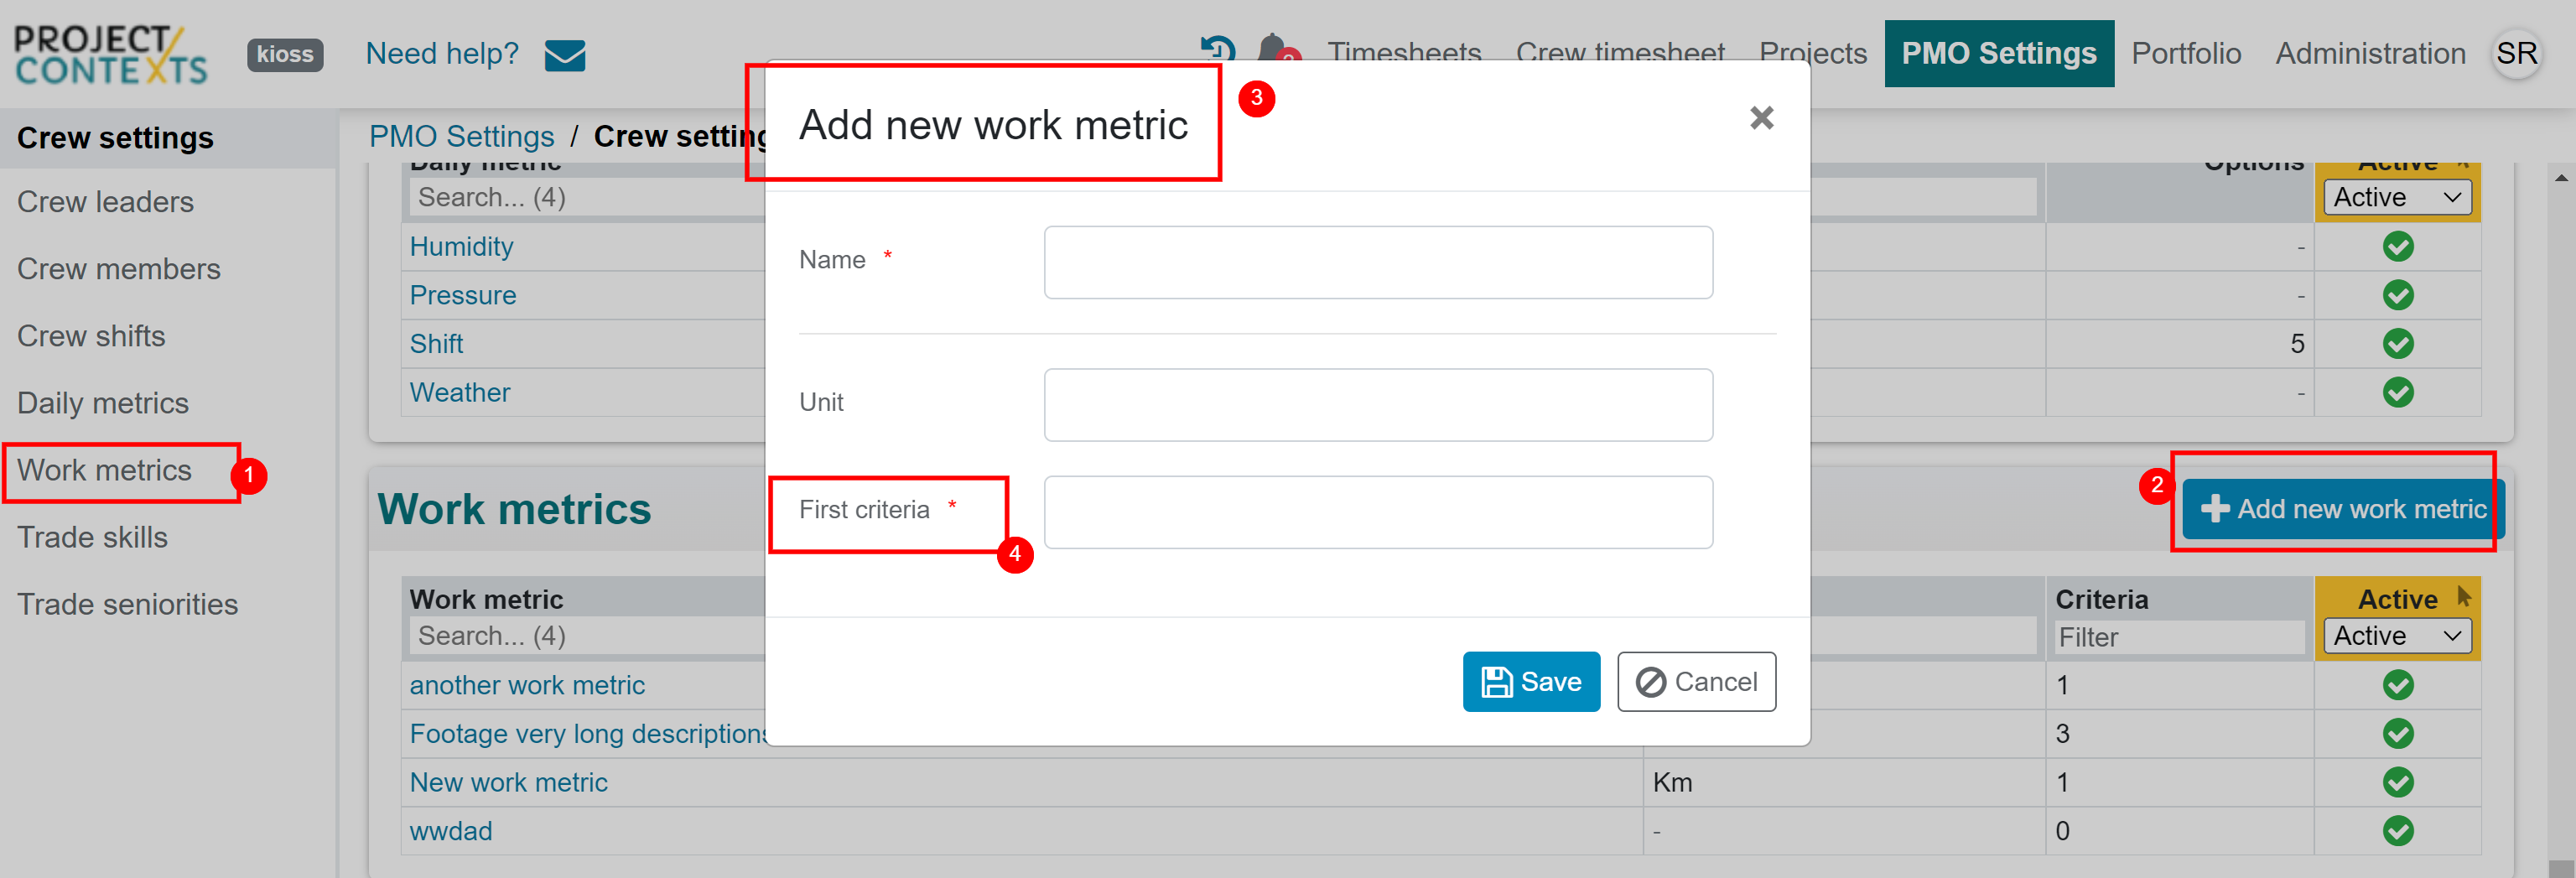
- Click on the Work metrics item in the left menu and then click on Add new work metric button on the far right corner of the page
- In the Add new work metric dialog that opens you can add a Work metric by:
- putting in a name
- putting in a unit (optional)
- putting in the name of its first criteria
- Usage is logged against Criteria and not against the Work metric directly
¶ Step 2: Add a new Project and associated Systems and Tasks
Add a new Project in the Project section of the app.
Breakdown the Project into Systems.
Under each System, add new Tasks. Hours are going to be logged to those Tasks.
¶ Step 3: Activate Crew Timesheet for the Project
Once the Project has been added and the work breakdown has been done (see above), the next step is to set up the Project so that it can use the Crew Timesheet.
¶ Step 3.1: Enable Crew Timesheet for the project
.png)
- Open the Project details page
- Click on Edit as shown in the figure
- Toggle the field Crew enabled to enable Crew Tracking for this project
- Click Save to save your changes
¶ Step 3.1: Shortlist Crew Leaders for the Project
.png)
- Once Crew has been enabled for the Project, the Crew settings will show in the Project left menu
- Select the Crew leaders tab in the Crew Settings page of the project
- Click on the Edit button and choose Crew Leaders from the available Corporate list
- Save your changes
- The Crew Leaders selected here will be the people who can log to the app and fill in the Crew Timesheets for this Project
¶ Step 3.2: Shortlist Crew People for whom time is going to be logged
.png)
- Select the Crews tab in the Crew Settings page of the project
- Click on the Edit button and choose Crew People from the available Corporate list
- Save your changes
- The Crew People selected here are those for whom time can be logged on the Crew Timesheet for this project
¶ Step 3.3: Shortlist Work Metrics and Criteria
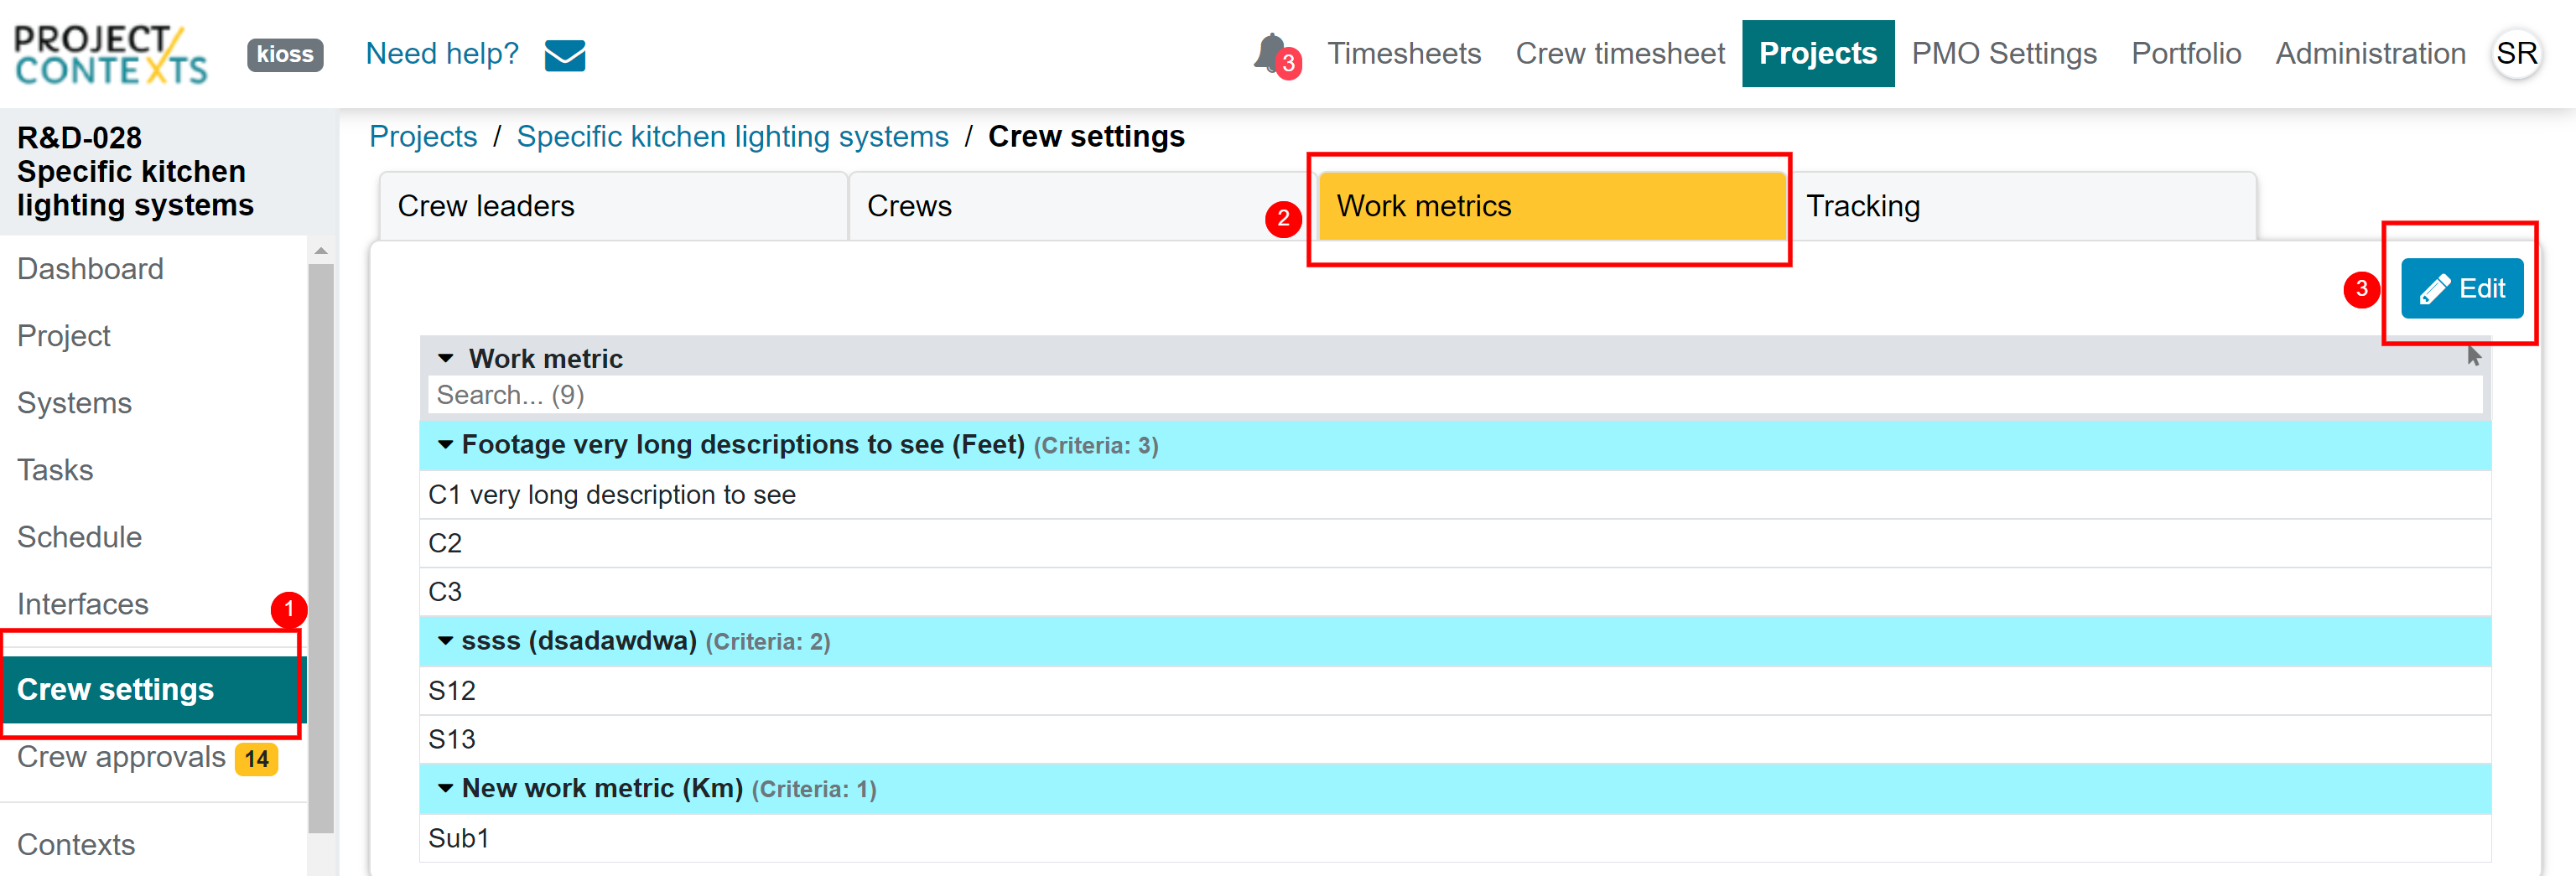
- Select the Work metrics tab in the Crew Settings page of the project
- Click on the Edit button and choose Work Metrics and Criteria from the available Corporate list
- Save your changes
- The Work Metric Criteria selected here are those for which usage can be tracked on the Crew Timesheet
¶ Step 4: Collect data on the Crew Timesheet
¶ Step 4.1: Select Project and date for which to log time and work metric usage
.png)
- First select the project from the dropdown list.
- If you do not see the project you want in that list, then that means crew timesheet has not been enabled and/or you have not been added as a crew leader for the project. Refer to the previous section to fix this
- Then select the date for which the report needs to be filled in
- Finally click on the Edit button on the far right to start logging
¶ Step 4.2: Log hours per tasks for each crew member for the project
.png)
- If you have activated shifts in the PMO Settings > Crew Settings, you will need to select the correct shift first
- Then select the people from the Add crew person drop-down; each one will appear in its own row on the timesheet
- Next select the activities from the Add activity drop-down
- Finally put in the hours in the cell that match the crew person and the activity
- You can additionally add the following information:
- Per crew person:
- Whether they are entitle for a Per Diem for that day or not
- Notes on that crew person in the Notes column
- For the whole timesheet: The work report
- Per crew person:
- Put in the hours worked
- There is a limit of 24h allowed per crew member per timesheet
- Save the timesheet
¶ Step 4.3: Log work metric usage
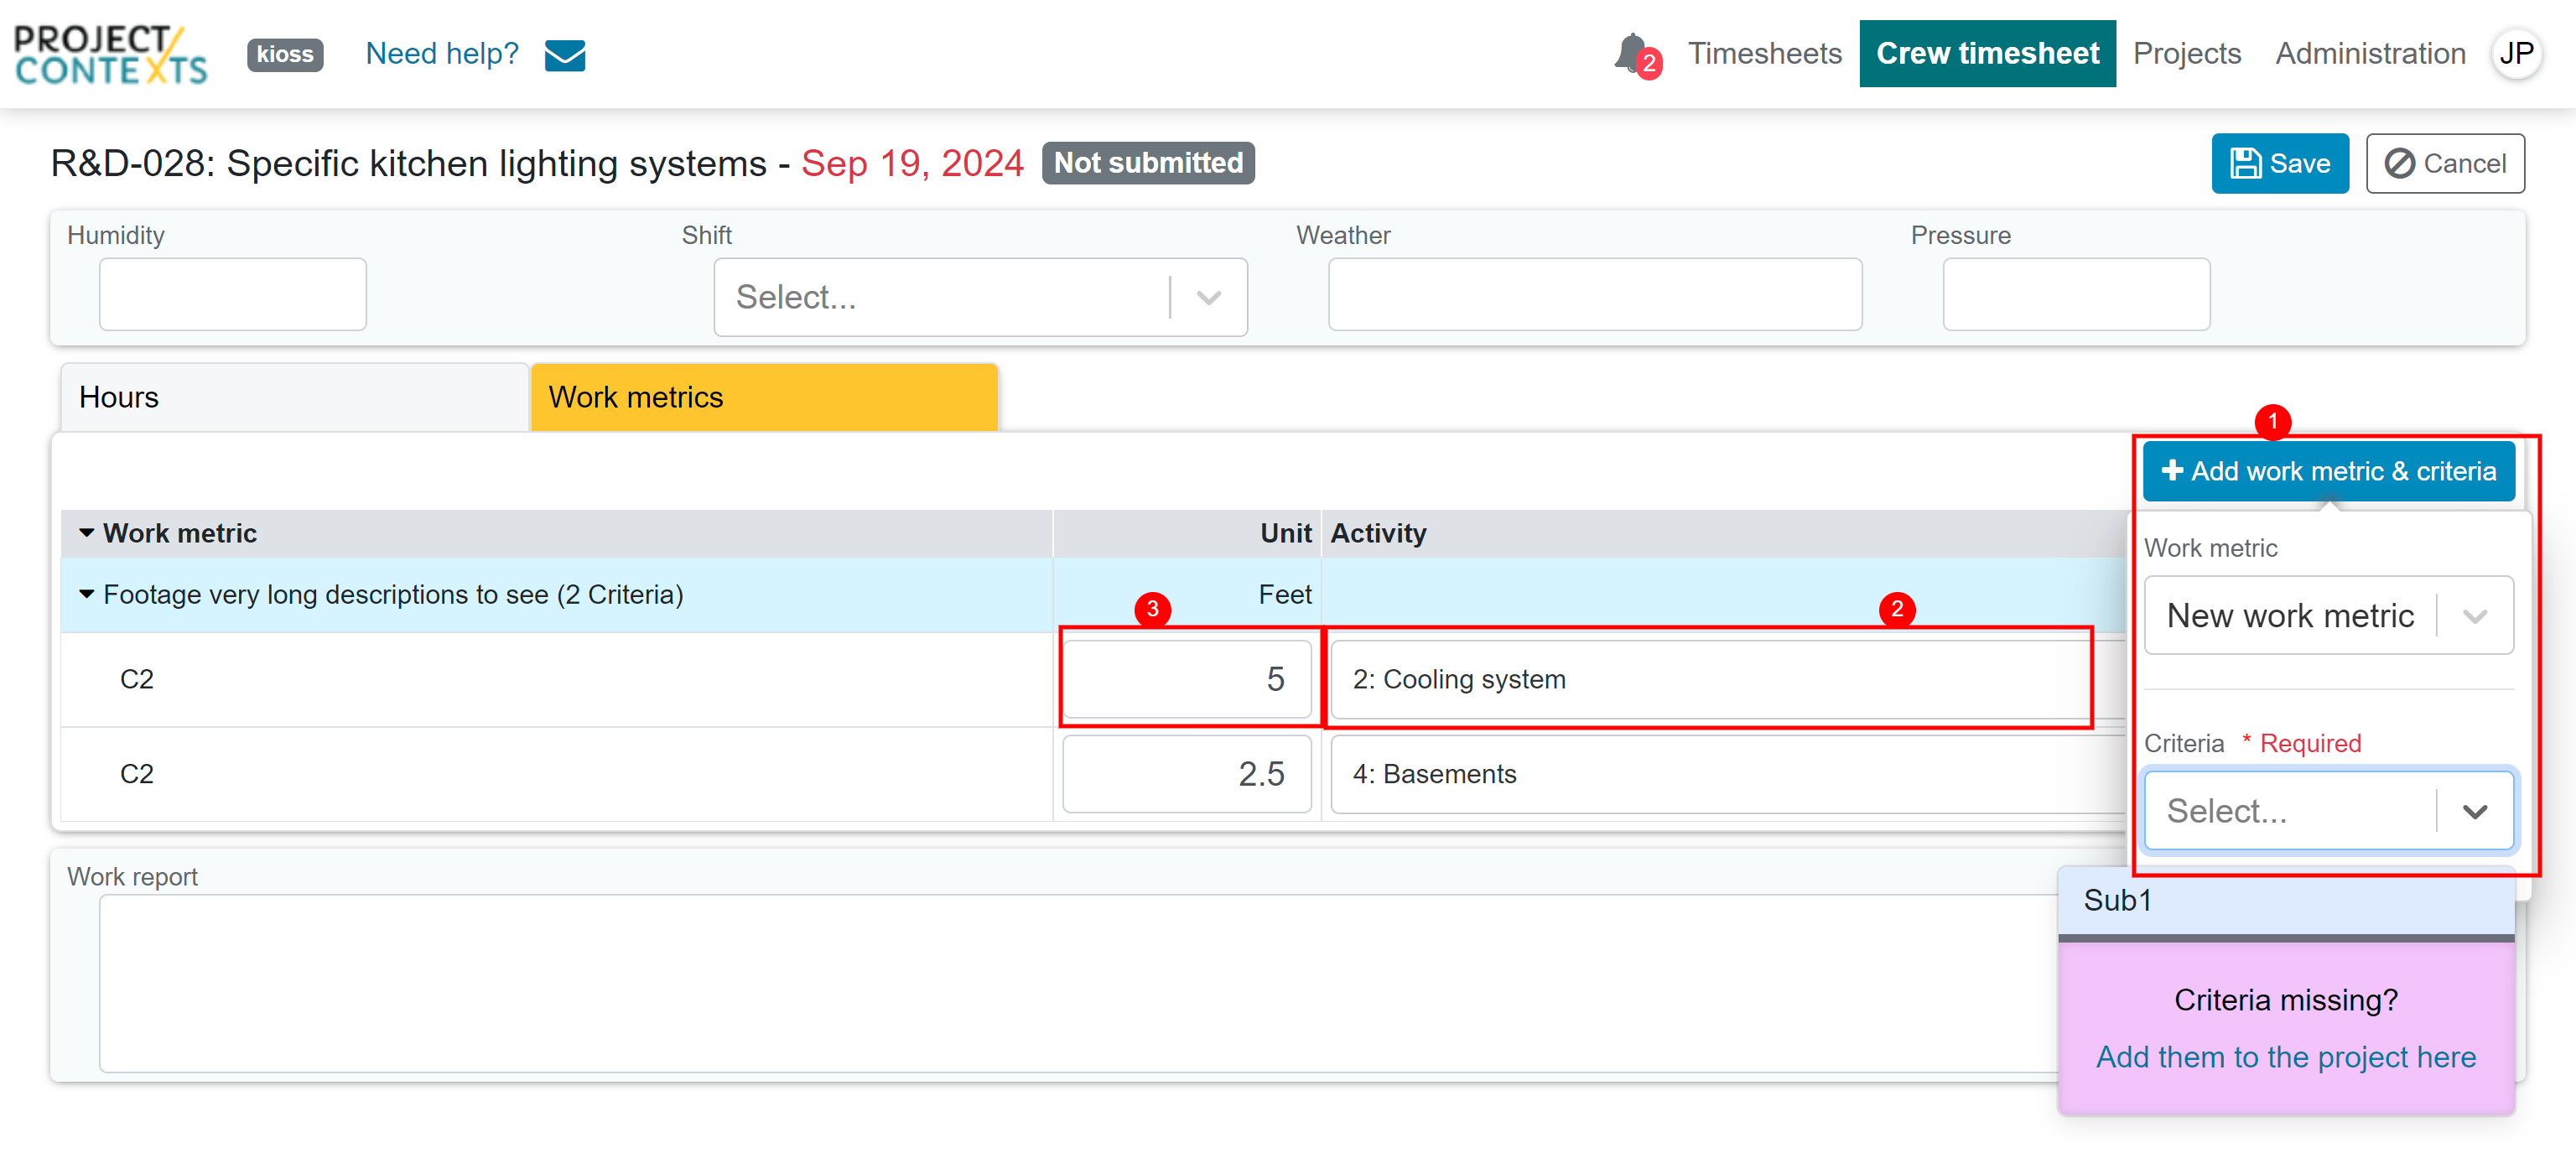
- Still in the edit mode of the, select the work metrics and associated criteria
- You can link the criteria to a system or task, depending on the Crew Tracking Settings for this project
- Then finally, you can put in the quantity used in the appropriate cell
- Save the timesheet
¶ Step 5: Approve Crew Timesheets
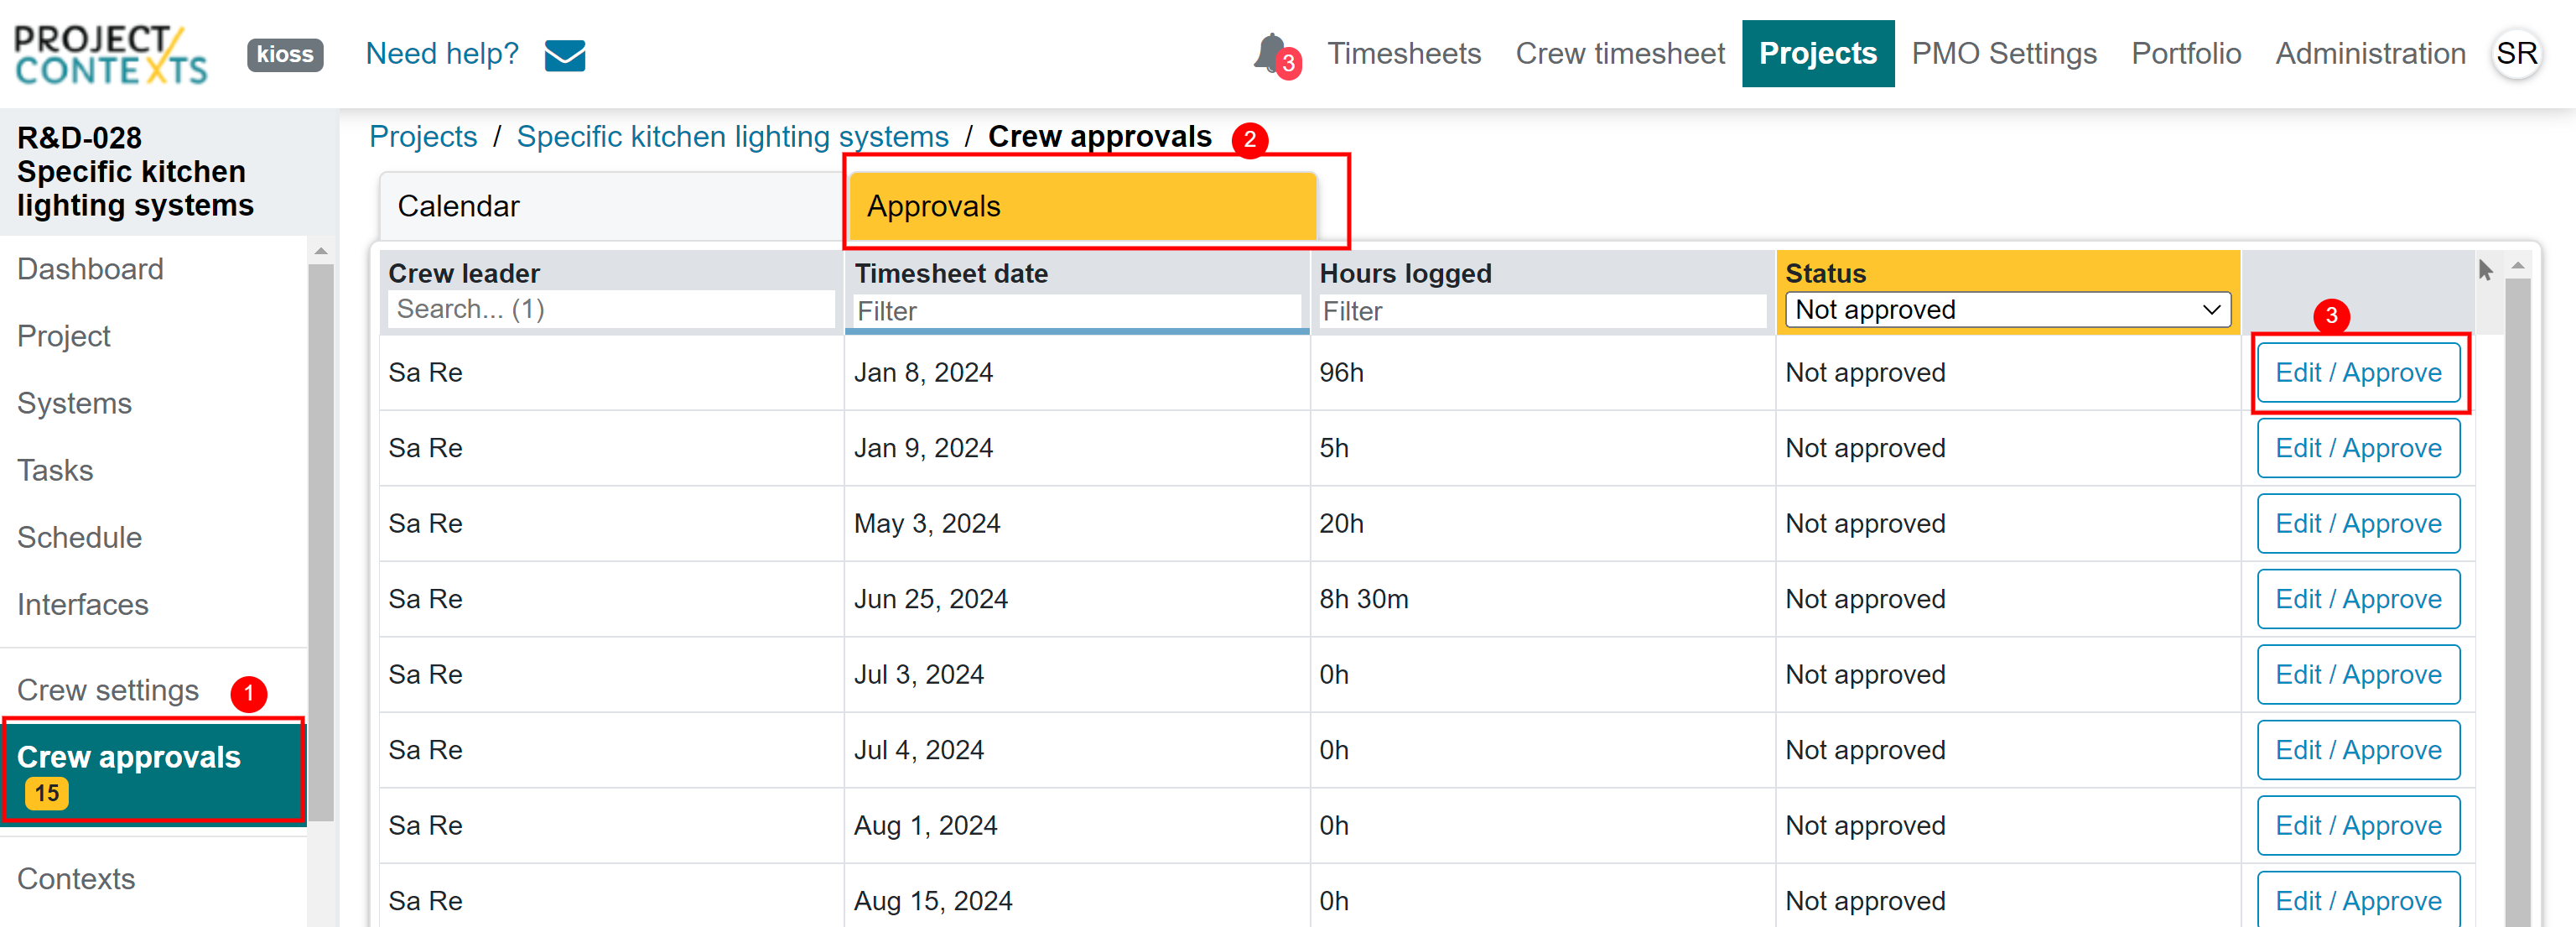
¶ 5.1: Accessing the timesheet to approve
- Before the data from a Crew timesheet can be visible in the reports or progress data, the timesheet must be approved first.
- The Project Manager or any user having full access to all Projects can approve timesheets for a project
- First open the project on the app, then go to the Crew Approvals section in the project
- Find the timesheet you want to approve either using the Calendar view or the List view.
- Click on Edit/Approve for this timesheet: This will open the timesheet
¶ 5.2: Approving the timesheet
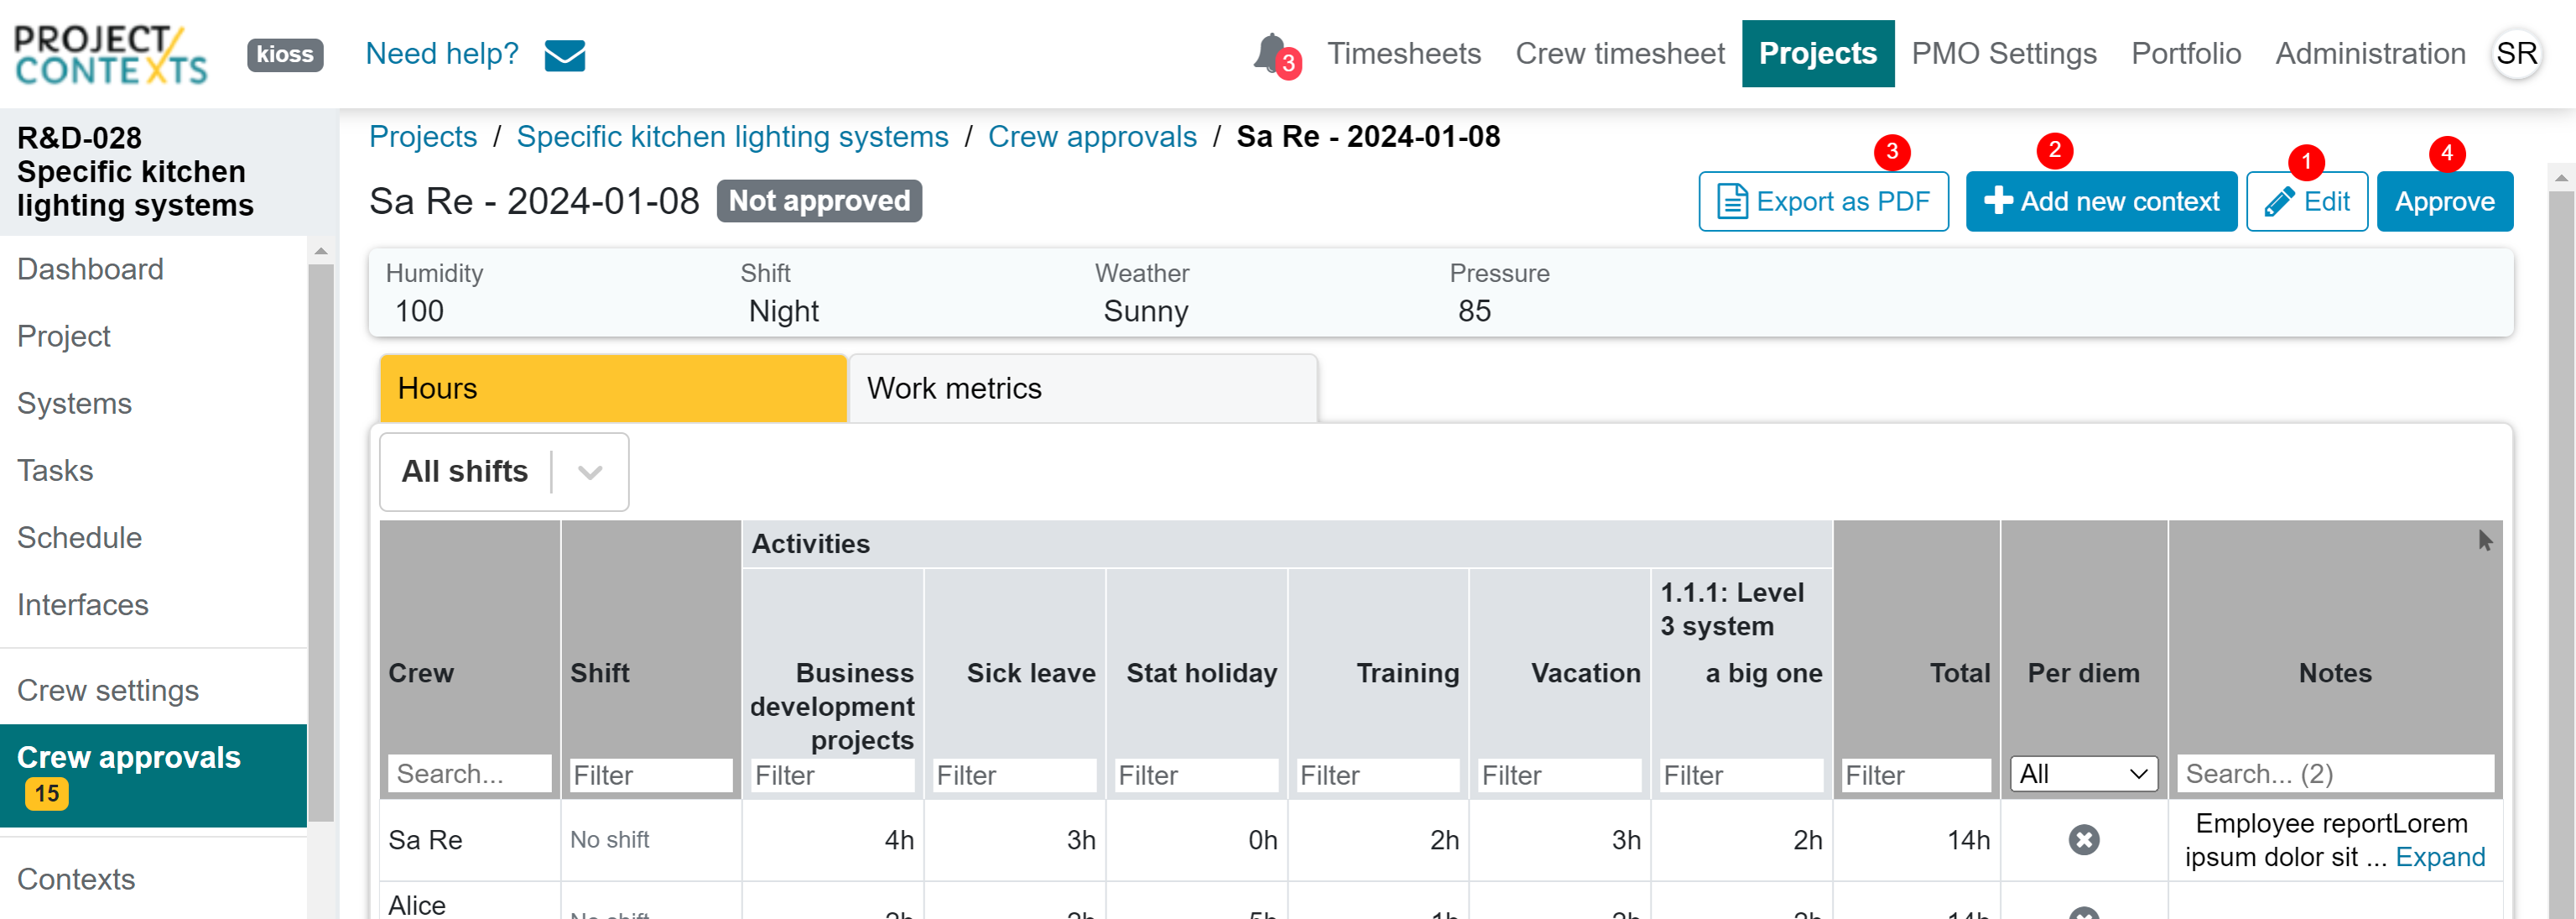
- You can edit any data in the timesheet
- Additionally:
- you can create Contexts if you wish to resolve any unexpected problem that you are made aware of via the timesheet
- Export the timesheet as a PDF
- Once you are satisfied with the data of the timesheet, you can approve it
- If you need to edit the timesheet after approval, you will need to click on the Undo approval button first and then only will you be able to edit it.
¶ Step 6: Generate Crew Reports
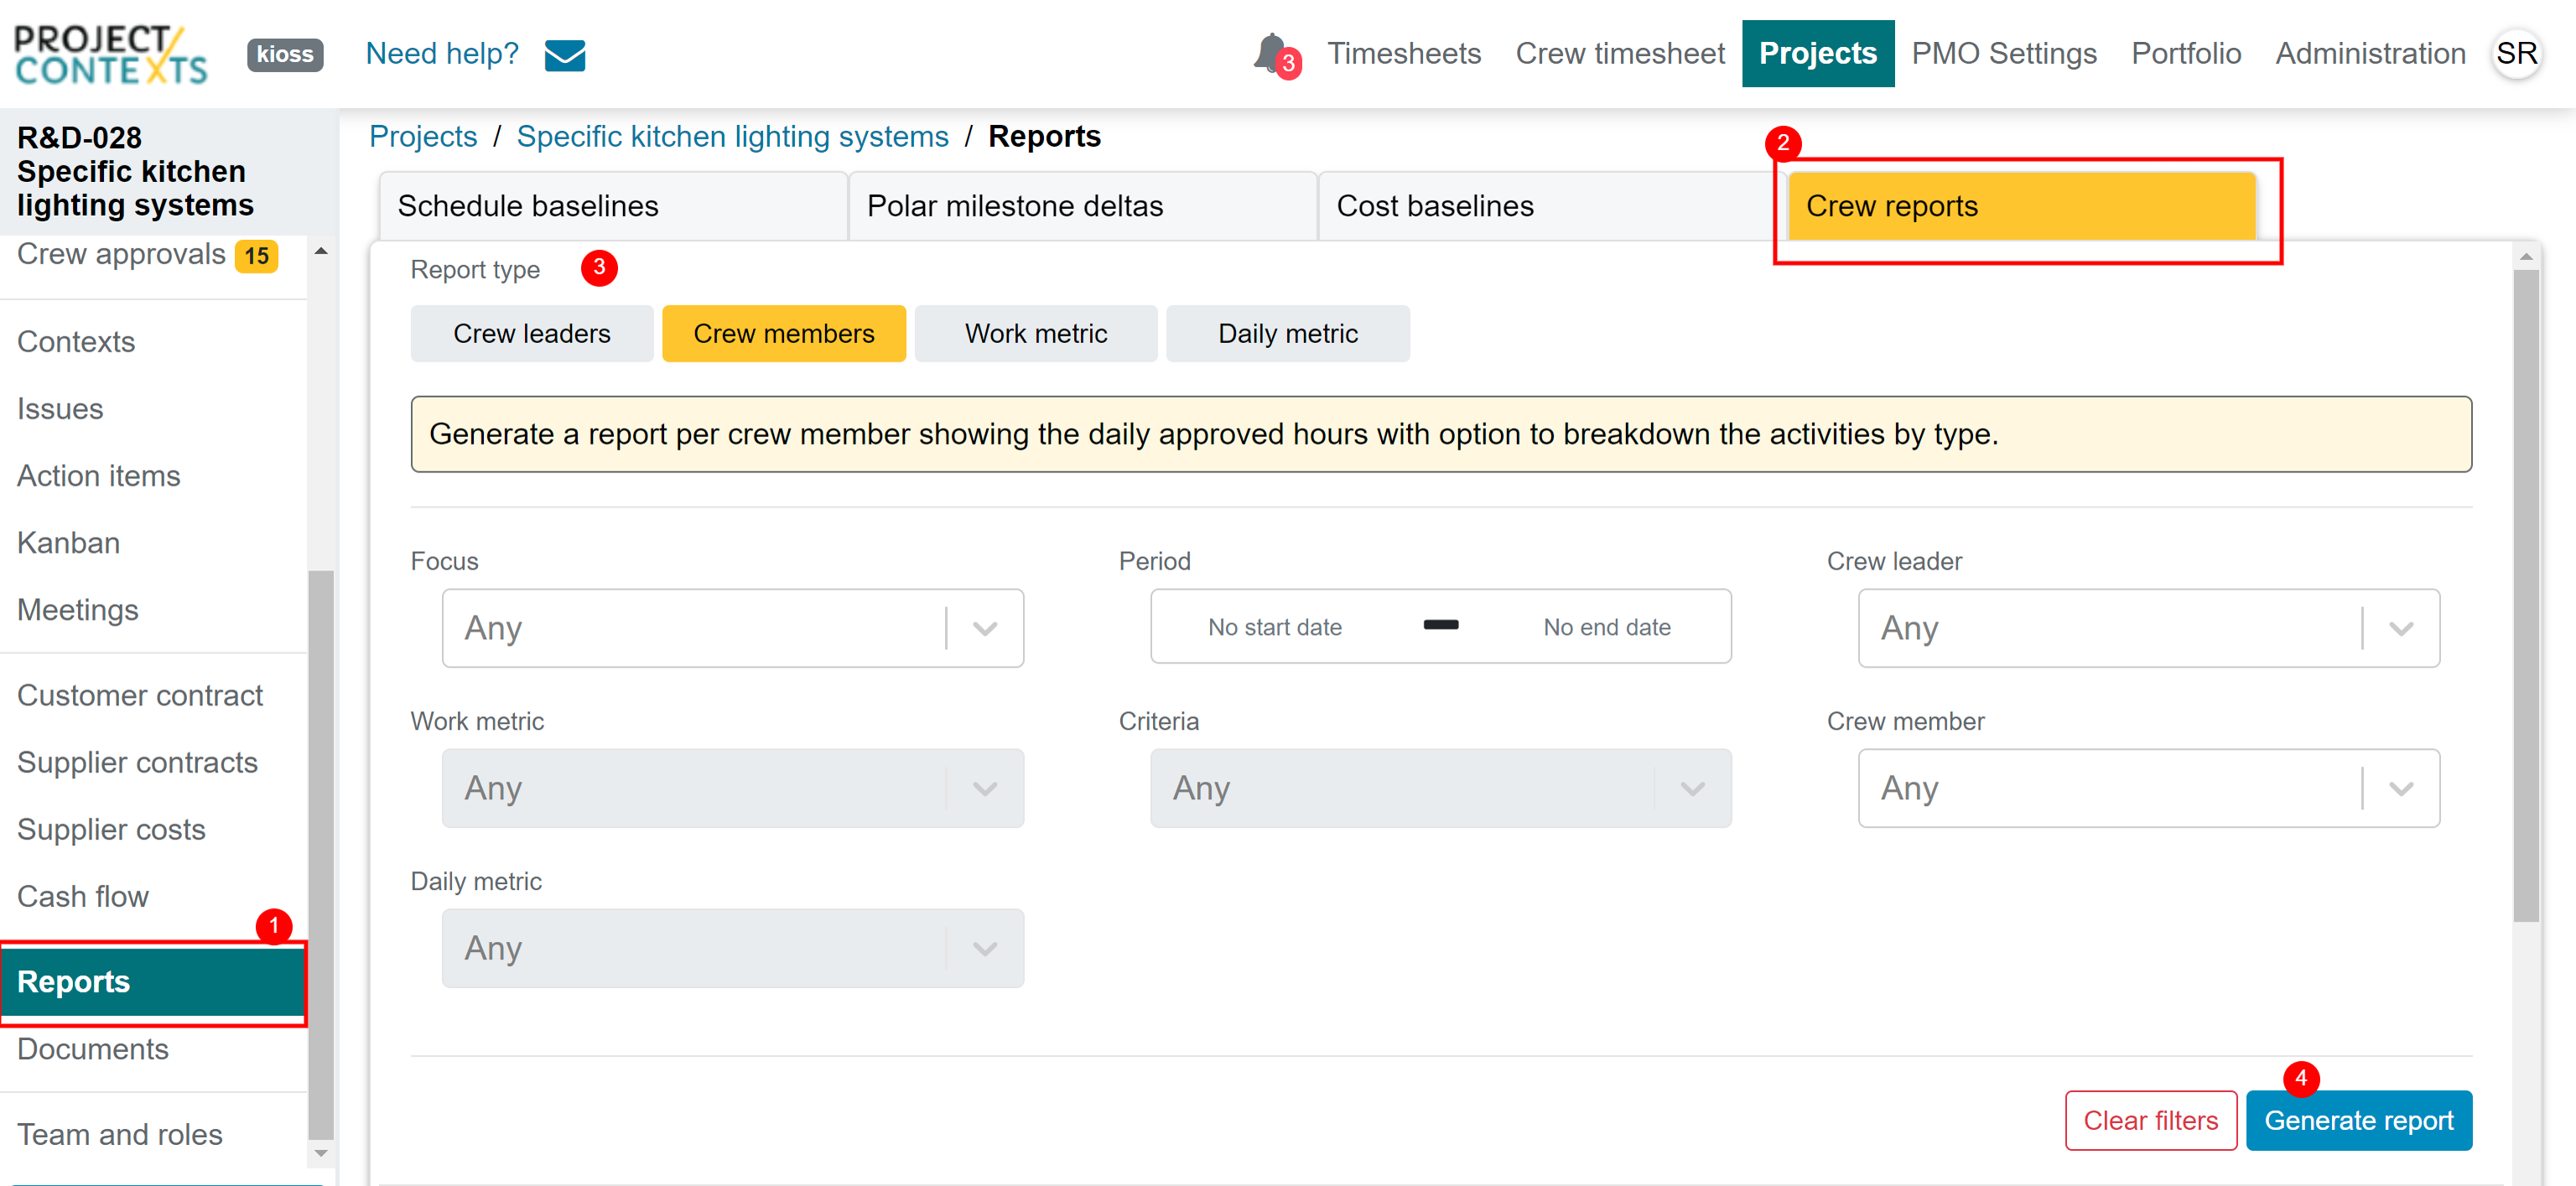
- Data collected from Crew Timesheets can be used to produce reports
- Go to the Reports > Crew reports section of your project
- Select the Report type and fill in the filters, then generate the reports
- Any report can be downloaded as a CSV file by right clicking the report table header and selecting Export table